In testing environments, determinism is key - having our application run the exact same way every time regardless of outside influences is crucial to long term stability and trustworthiness of the test suite. That is why Renode, our open source simulation framework, focuses on providing the capability for deterministic testing of hardware systems in software.
Renode excels at simulating multi-node systems and distributed applications, but enabling determinism for such complex environments takes some work. In a previous blog note we demonstrated how to run micro-ROS based firmware on a simulated STM32F4 Discovery board, which communicated with the main Linux node that was not simulated but running on the host, and hence, not deterministic. In this note, we will describe how to update this system to a fully simulated one, providing full determinism.
Having a fully simulated system is useful especially for scenarios (common at Antmicro) where the Linux node itself is subject to ongoing development. To be able to develop and test new ROS nodes both on the Zephyr RTOS and Linux side, we needed a fully deterministic environment which runs independently of the underlying hardware capable of handling the tasks that micro-ROS requires of the main ROS 2 node. For this, we used a simulated Xilinx Zynq-7000 device, and this note will describe the details of the implementation.
Building a reproducible system with VirtIO and Yocto
ROS 2 is based on Linux and requires significant disk space to install its dependencies. Fortunately, with the recent advances in Renode this is not a problem. Support for VirtIO virtualized block devices - a technology for passing disk images into virtual machines / simulations - removed the need to allocate huge chunks of system memory to have a ramdisk with all of the core packages, which drastically reduced resource usage and load times.
With a solution to the loading time issue in hand, we needed to prepare a Linux image containing everything necessary for running ROS 2 and the micro-ROS agent. Relying on pre-built images, while nice for getting a quick result, is not really in the spirit of deterministic, from-scratch reproducible testing - we needed something that could be built from source with all the necessary dependencies.
The answer, as usual, was the Yocto framework which allows you to build embedded Linux systems from source based on recipes for various software packages collected in topic-oriented layers. It’s a technology used across dozens of varied customer use cases at Antmicro on a wide range of platforms, both with and without ROS in the loop.
ROS 2 is well supported in Yocto via the meta-ros layer that provides all the necessary recipes for a core deployment of ROS 2 on a base system. What the layer does not contain are any recipes related to the communication with micro-ROS - just some dependencies for the agent that come standard in many other packages. We needed to extend it by creating recipes for all missing packages that are usually built using completely different methods.
The key software needed for running micro-ROS nodes on MCUs is the micro-ROS-Agent - it sends data between the micro-ROS node (running i.e. on a microcontroller, and communicating via TCP/UDP protocols, or via serial console) and the ROS2 middleware (which handles all ROS2-based communication, services, topics, etc.) The micro-ROS-Agent uses the Micro-XRCE-DDS-Agent library for translating the micro-ROS messages to ROS2 messages and vice versa. The build processes for both libraries are tightly coupled within the superbuild script - a script taking care of compiling and downloading its own dependencies.
Since both packages were missing in the meta-ros layer, we decided to add them to our own, recently released meta-antmicro layer, described in a separate blog note.
We created separate recipes for micro-ROS-Agent and Micro-XRCE-DDS-Agent, providing all the build and runtime dependencies and compilation flags in a Yocto way. This makes the build process more clear, reproducible and also customizable (using i.e. Yocto’s appends to recipes).
Running tests on the new architecture
After the micro-ROS firmware was able to communicate with its simulated host machine we needed to adapt the tests to this new architecture. Previously our test files managed processes on the host operating system and launched the simulations when needed. The adapted versions needed to take care of launching each simulated machine at the correct moment so that the communications would not time out and the simulation scripts additionally needed to create the UART connections that would be used to connect the devices together inside of Renode.
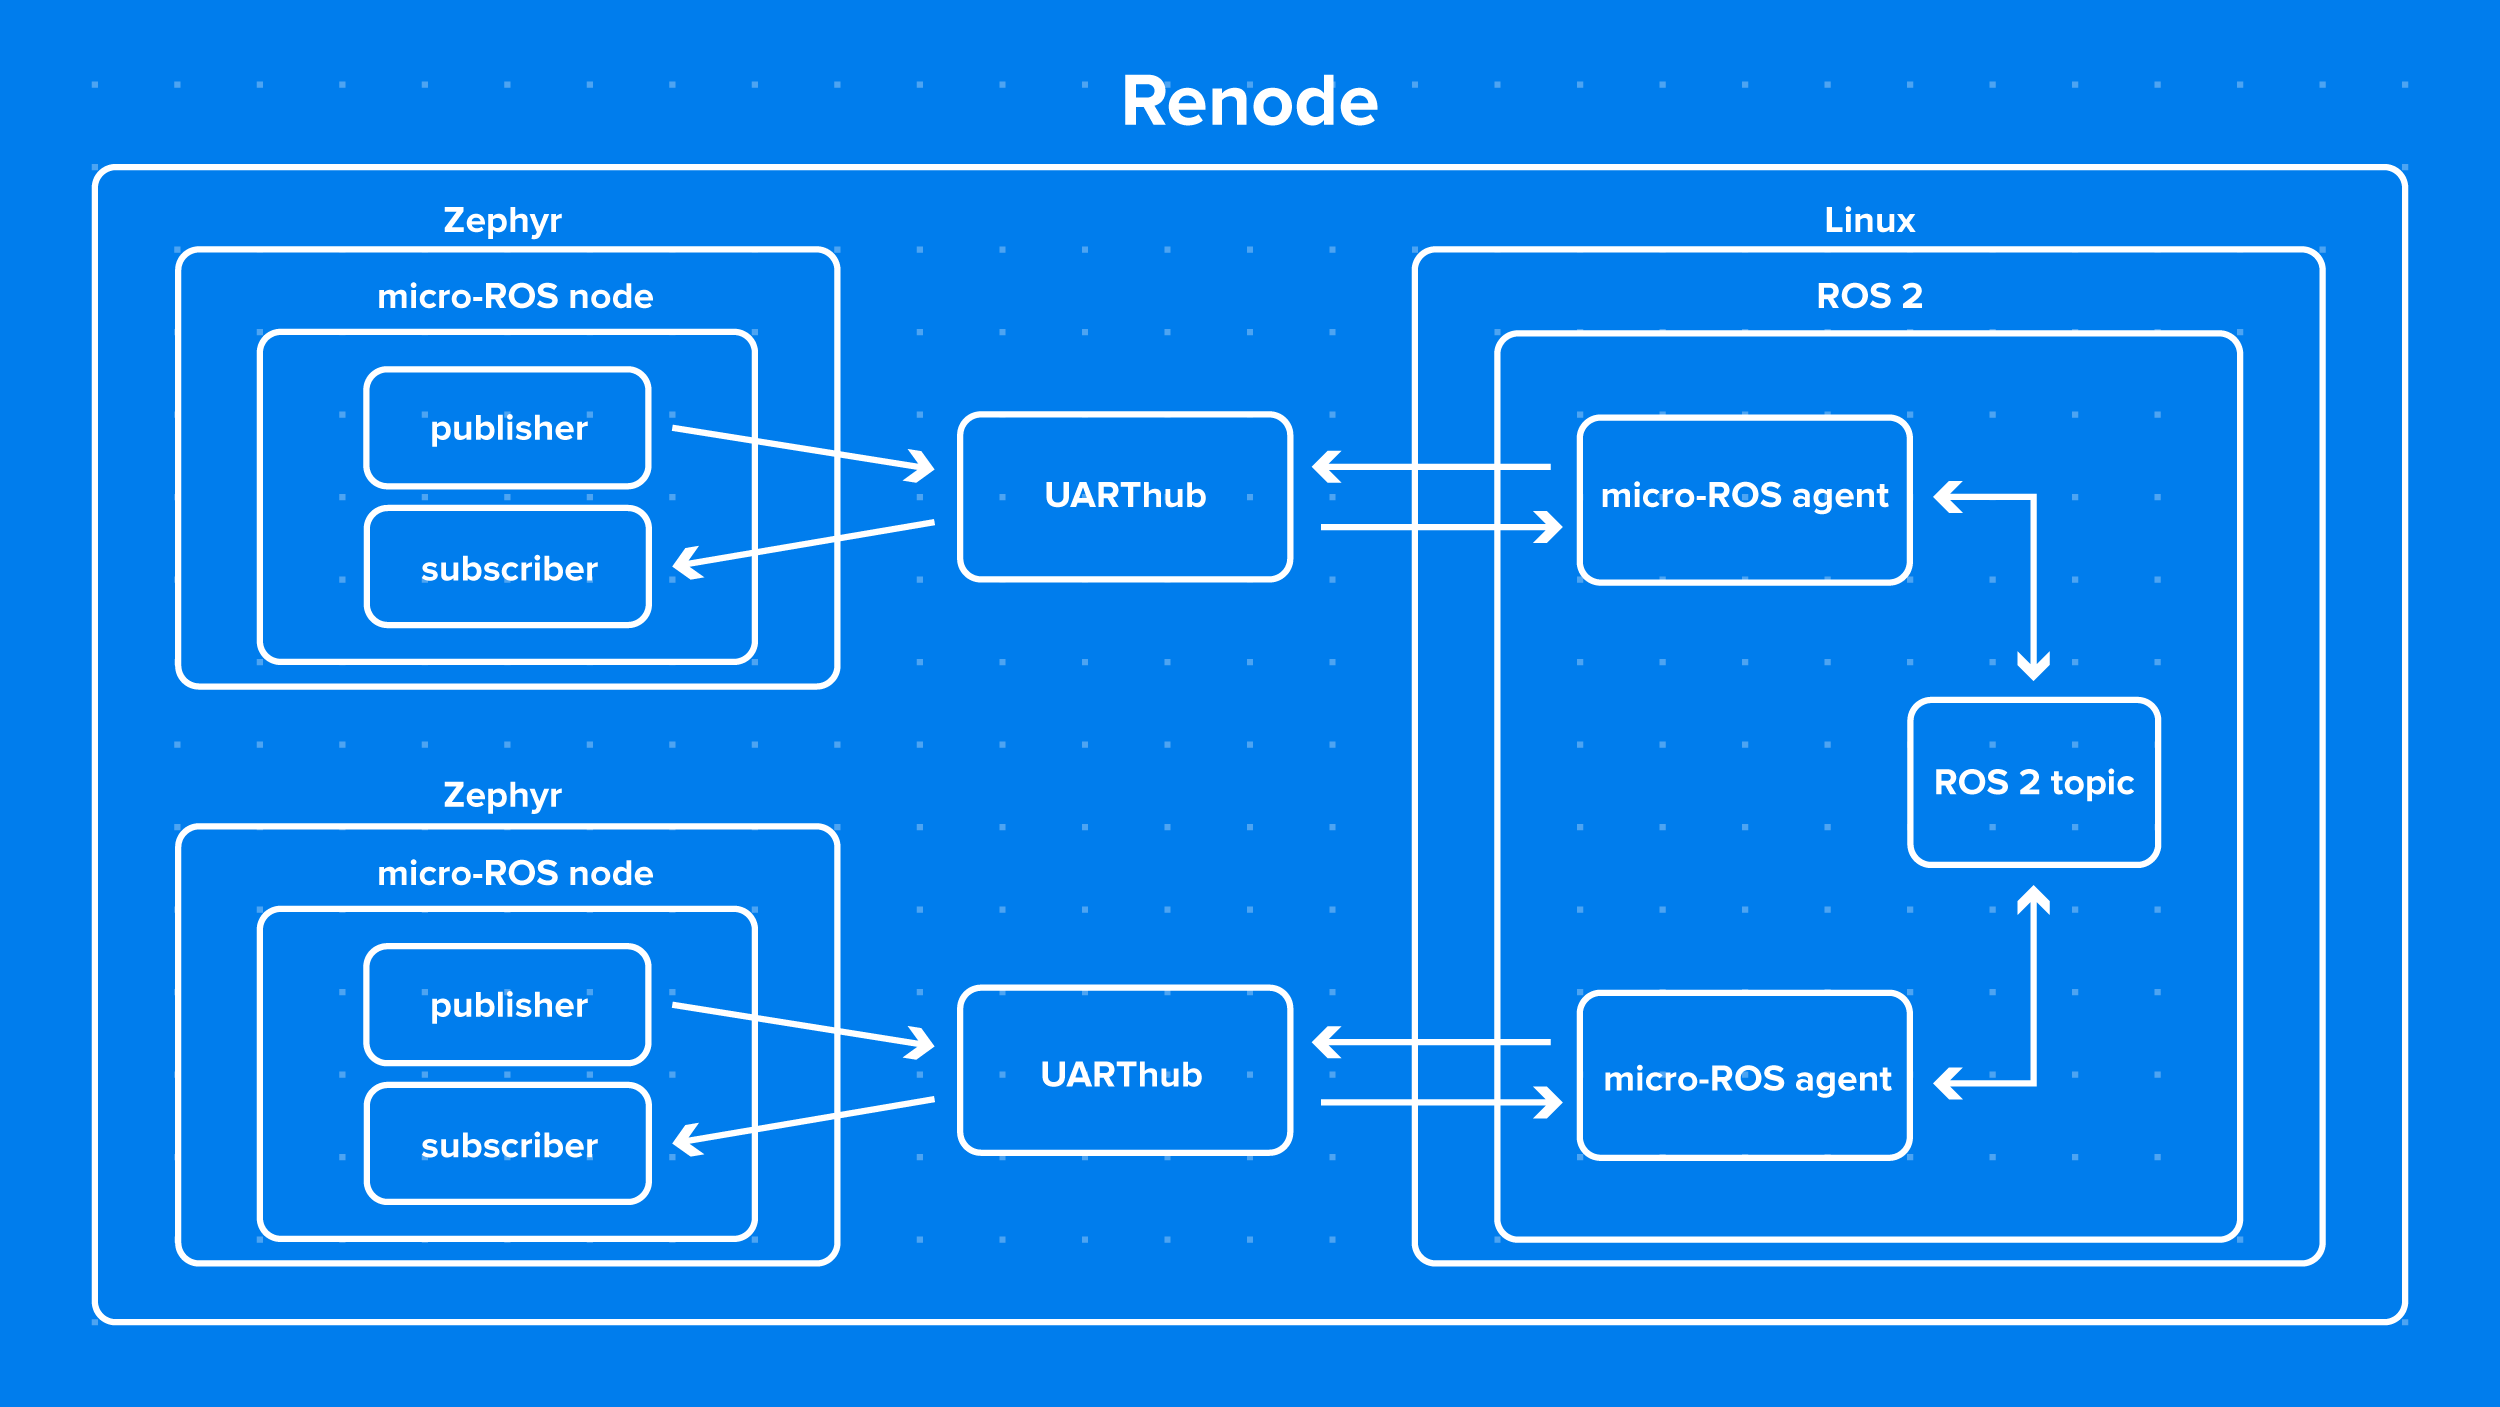
The micro-ROS to micro-ROS test was simple enough. We wrote init scripts to launch the two required agents at boot time and injected a modified inittab to remove the login shell and kernel output, since our chosen platform, Xilinx’s Zynq-7000 based Zedboard, only features two UART connections and both were needed for our micro-ROS devices. Another possible approach would have been to extend the virtual Zynq with an additional UART, but this would require additional changes to the Zedboard’s device tree and so we decided against this for simplicity.
Now we were able to first test one and then two instances of the STM32F4 simulation running the micro-ROS firmware for publishing and subscribing to the data.

As usual, we used Robot Framework to automate the tests and thanks to Renode’s handy custom Robot keywords we were able to monitor the two STM32’s secondary UARTs for text messages, confirming proper transmission and reception. Now we have arrived at a fully capable deterministic Linux + ROS 2 + Zephyr & micro-ROS testing platform.
The micro-ROS -> ROS 2 Subscriber test
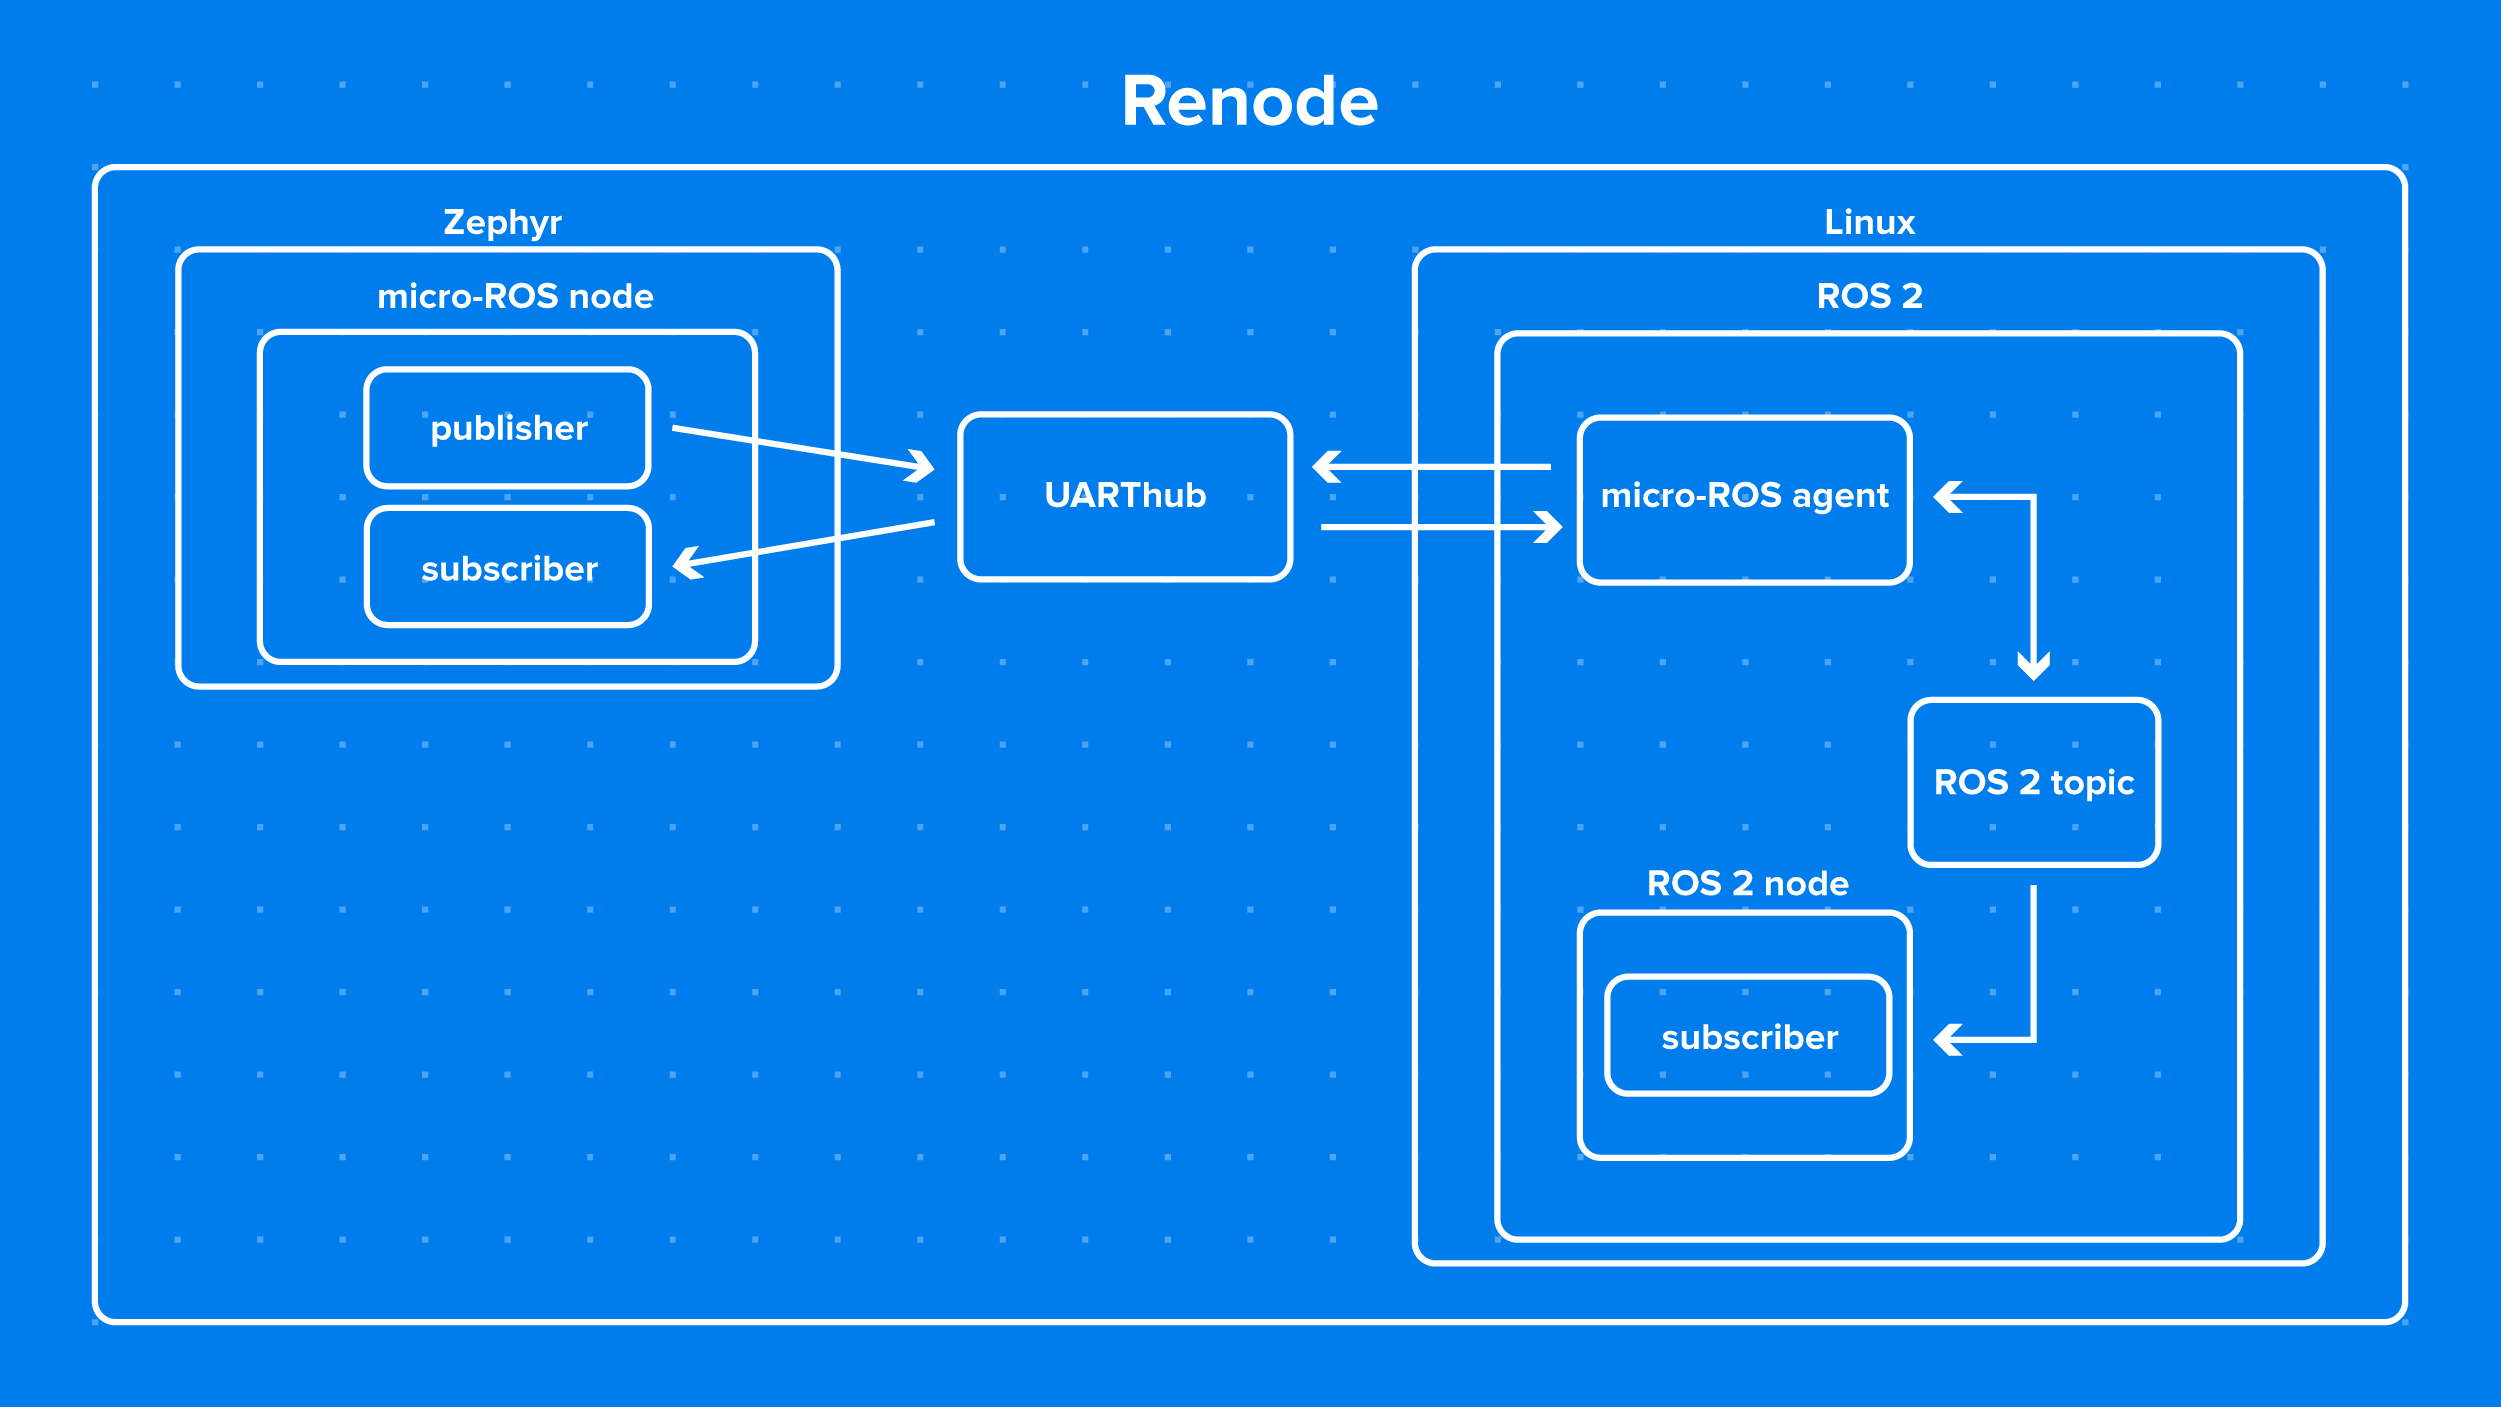
Next in line to migrate to the new architecture was the micro-ROS -> ROS 2 Subscriber communication test.

It required two fixes to function properly:
- The first one was entropy starvation. Embedded systems often have issues collecting enough randomness for the entire system unless specific devices are present in the chip. Most programs dealing in communications, even simple ones like
ros2 topic listrequire some entropy for random key generation, of which there was none left after boot. This problem was easily solved using thehavegedpackage which provides userspace entropy from different sources. - The second issue however was a bit more tricky. It turns out that the Yocto based firmware does not set the
RMW_IMPLEMENTATIONenvironment variable tormw_fastrtps_cpp- the ROS Middleware implementation used by the micro-ros-agent package. After this change, we were ready to go.
Creating a Renode test setup including a Linux node
The demo can be quickly run using prebuilt binaries. There are detailed instructions on how to build every piece from source in the repository’s README file.
Clone the repository:
git clone https://github.com/antmicro/renode-microros-demo.git
cd renode-microros-demo
Download the Zephyr/micro-ROS STM324 Discovery binary:
wget -O renode/zephyr.elf https://dl.antmicro.com/projects/renode/zedboard--microros-zephyr.elf-s_1935156-3771522c91ed0f88a761d82a37e245497c142140Obtain the Yocto-based Linux image(s):
Make sure that you are located in the root of the repository and run:
./download_binaries.shRun the demo(s):
To run the micro-ROS to micro-ROS communications test, run Renode with the following set of commands.
renode -e "start @renode/zynq.resc; sleep 150; start @renode/first_instance.resc; start @renode/second_instance.resc"This will launch the linux machine, wait an appropriate amount of time and then launch two STM32 machines.
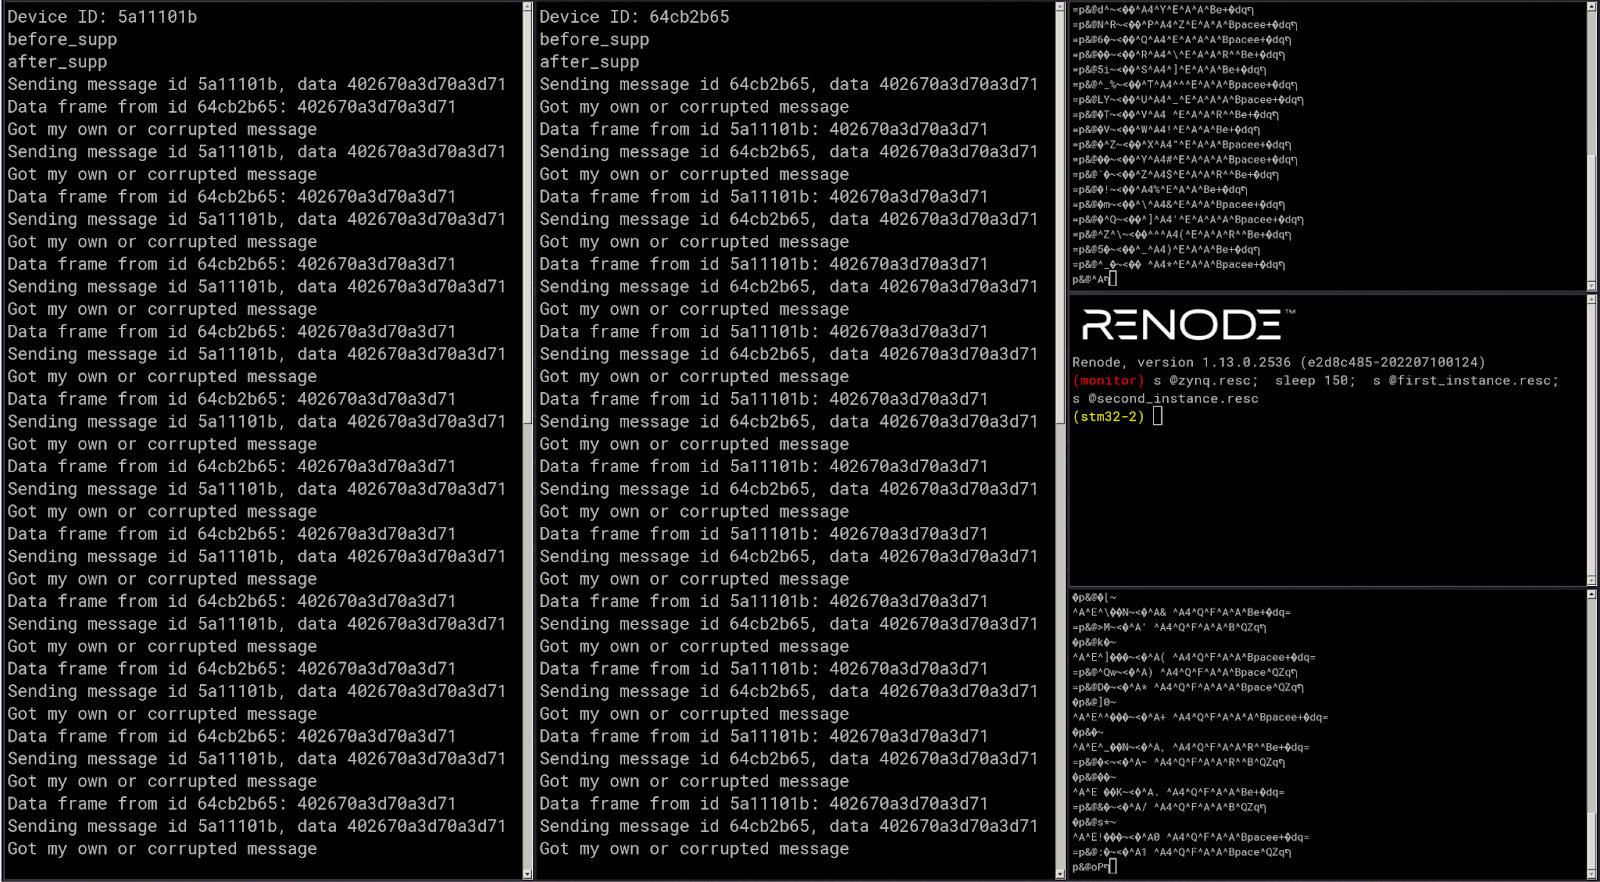
A sign that the demo is working is a line beginning with
Data frame from id...in the STM32’s message log.Alternatively, you can test the functionality with the robot file:
renode-test tests/multi-node.robotTo run the micro-ROS to ROS 2 communications test, setup Renode with just the Linux machine booting. You will see a login screen once it’s ready:
renode -e "s @renode/zynq_login.resc"
When the login dialog shows, login with
rootand no password, and in the simulated systems’ shell run:. /usr/bin/ros_setup.sh . /usr/share/subscriber/local_setup.sh export ROS_DOMAIN_ID=0 export RMW_IMPLEMENTATION=rmw_fastrtps_cpp ros2 run subscriber subscriber_nodeAfter running the last command, in the Renode console run the following command:
s @renode/first_instance.rescand look for communication on the simulated systems’ terminal. A
Got from MicroROS id...line will signify success.
Alternatively, you can launch an automated test:
renode-test tests/ros2_communication.robotThat’s what the micro-ROS to micro-ROS test with a Linux node running in Renode might look like:

Hardware-less and automatic testing with Renode
Renode scales to devices of various sizes, from MCUs to application processors, just like ROS does thanks to its micro-ROS variant. This is why Renode is excellent for deterministic testing of even complex, heterogeneous multi-node ROS/micro-ROS systems. micro-ROS’ support for Zephyr as the hardware abstraction layer opens the door to easier portability as well as a vast array of potential applications thanks to the sheer amount of other software packages available for this RTOS.
Complex systems need ever more testing, and Renode provides a great set of tools to perform advanced tests, ultimately allowing to incorporate entire networks of devices into a single test or manual run. The automation and CI provided by Renode with the Robot Framework are unmatched by hardware-in-the-loop testing and help improve quality, speed and reproducibility of embedded development.
If you want to develop your own ROS-based distributed computation system with automated testing and CI support provided by Renode, reach out to us at contact@antmicro.com and find out how we can help.


