Renode is an open-source hardware simulation framework developed by Antmicro. Thanks to its modularity and configurability it can simulate a wide range of platforms and run different kinds of software, ranging from simple bare-metal or small RTOS-based applications consisting of a single, self-contained binary, up to full-blown Linux-based setups. The challenge of running more complex simulations lies in the number of components that you need to prepare, configure and (most probably) update in subsequent iterations.
To have a usable Linux-based environment, for example, you need not only a kernel, but also an additional filesystem with tools, libraries and applications, aka userspace. To work with Linux userspace applications in Renode you’d need to either prepare them directly in simulation or cross-compile them on the host machine and upload results to the simulation. Working entirely in simulation is not always desirable, e.g. due to the lack of tooling the programmer is used to working with. That’s why we find cross-compilation more suitable for this task. The question is: how should we upload results to the simulation target efficiently? In this note, we will describe multiple approaches to do so, including one that we have just recently implemented: Virtio.
Just build it into the filesystem
A most basic approach is to change the build flow and include the userspace application in the target filesystem. Unfortunately it takes a lot of time and requires knowledge about how to modify the particular build process. Very often we have to work with filesystems provided from external sources, which we are not always able to rebuild. Everything gets even more complicated when using CI is desirable. Every change done to the userspace application requires the whole rootfs to rebuild and it’s not easy to use partial results of previous builds.
Alternatively, it is possible to repack the rootfs content locally. Since some archives are not mountable, it’s easy to corrupt the host filesystem by mistake. Packing larger userspace applications into small archives might also require a lot of effort.
Those simplistic approaches do not scale well, as we know that developing and testing userspace applications and filesystems is a challenging and time-consuming task. That’s why we equipped Renode with features making the process more efficient and less error-prone. The following sections describe three better ways in which you can connect your externally-built filesystem to the simulation and share resources (files) between the simulated and real platforms.
Host-guest networking
Renode allows you to optionally connect the internal simulated network to the host machine. This mechanism can be leveraged to share files between systems using standard tools, e.g. http server and the wget client. The topic of the host-target network connection is broadly described in Renode’s documentation, so below we will go through the configuration process quickly.
First of all, you need to prepare a simulated network. All setup is performed in Renode’s Monitor. This process starts with creating a switch:
emulation CreateSwitch "switch1"Of course you’re free to use another, more descriptive name than switch1 if you want.
Now you have to connect a network interface to this switch using the connector mechanism (make sure that Monitor’s context is set to the correct machine, machine-0 in this example):
mach set “machine-0”
connector Connect sysbus.ethernet switch1
With this setup done you can proceed to setting up host network connection. With the help of the TAP driver you can create a virtual interface on your host:
emulation CreateTap "tap0" "tap"This interface will be visible on your host system as tap0 and inside Renode as host.tap. To make use of it you have to configure tap0 on your host machine, because it will be created with no IP and in a “down” state. In Renode this interface has yet to be connected to a switch, which can be done using the previously mentioned connector mechanism:
connector Connect host.tap switch1With these preparations complete it’s now possible to start the simulation, log into the emulated Linux machine, configure the network interface and transfer files from the host computer to emulation using wget. You will need to use an IP address associated with the HTTP server running machine on the host machine, for example:
wget http://172.29.34.15/home/user/file.txtDespite being a very viable and commonly used solution, it has some serious drawbacks. Your simulated machine needs to provide a working network controller which must be able to connect with the host. Moreover, this is platform-specific, since it makes use of the TAP drivers that Renode supports currently on Linux hosts only. A simulated network is also relatively slow when compared to regular filesystem operations. Sending files bigger than a few megabytes may be inconvenient when repeated often.
It doesn’t get easier in testing environments. Mostly because setup requires network configuration, not necessarily possible in all CI systems, and processing can be influenced by the network traffic on the host machine. This makes tests not deterministic (which you would probably like to avoid).
We wanted to overcome these obstacles and came up with two alternative solutions: using built-in TFTP server or Virtio. Each approach has its advantages over the other one and this fact gives you the possibility to choose the right tool for the job.
TFTP
TFTP (Trivial File Transfer Protocol) is a simple protocol which allows file transfer between a client and a remote host. This protocol is commonly used in bootloaders implementing some kind of network booting. In our implementation we can upload a file from the host machine on a server and then download it in emulation. It’s a great tool when you have a network interface and you want a simple mechanism for transferring files between host and guest.
Let’s take a look at a TFTP configuration in Renode. Firstly, you have to create a switch (same as for every network based solution) as follows:
emulation CreateSwitch "switch"
connector Connect sysbus.ethernet switch
Then, you can create a network server inside Renode and start a TFTP service for it.
emulation CreateNetworkServer "server" "192.168.100.100"
connector Connect server switch
server StartTFTP 69
(Notice that we explicitly specify a port number.)
As an example we will show you how to load a MicroPython binary and boot it on a LiteX platform using netboot. To configure the TFTP server and make it expose the litex_vexriscv_micropython binary use:
server.tftp ServeFile @binaries/litex_vexriscv_micropython.bin "boot.bin"Then you can run the emulation and boot the binary you saved in the “boot.bin” file:
litex> netbootThis makes the LiteX BIOS use TFTP to download the MicroPython binary and boot straight to it, leaving you with an interactive Python shell.
The greatest strength of this approach is simplicity. Configuration doesn’t require any interference in machine structure (no need to modify kernel, repl file, device tree, etc.). Everything can be done in the Monitor. Another big advantage is that it does not require host integration, providing an isolated solution which can be tested in a deterministic way. Finally, TFTP is cross-platform, so you can easily set it up on CI.
As a side note, having a built-in TFTP server in Renode allows you to verify the correctness of the TFTP layer in the application in the deterministic simulated environment.
However, there are physical platforms that don’t support network controllers. That’s why we had to find another approach for host file access, and Virtio is well suited for this.
Virtio
Virtio is a widely used standard for virtualized devices supported in modern OSes. It declares a uniform and simple (yet flexible) interface to a range of peripheral types including network controllers, block devices, consoles, input devices (like virtual keyboard or mouse) and generic socket-based devices.
We have recently added support for the MMIO-based Virtio block device model to Renode. With this extension to the framework it is possible to dynamically load filesystem images and make them available in e.g. Linux simulation without the need of kernel/rootfs recompilation & reloading. This proves especially useful when sideloading user-space applications, as using the Virtio approach significantly reduces the round-trip time.
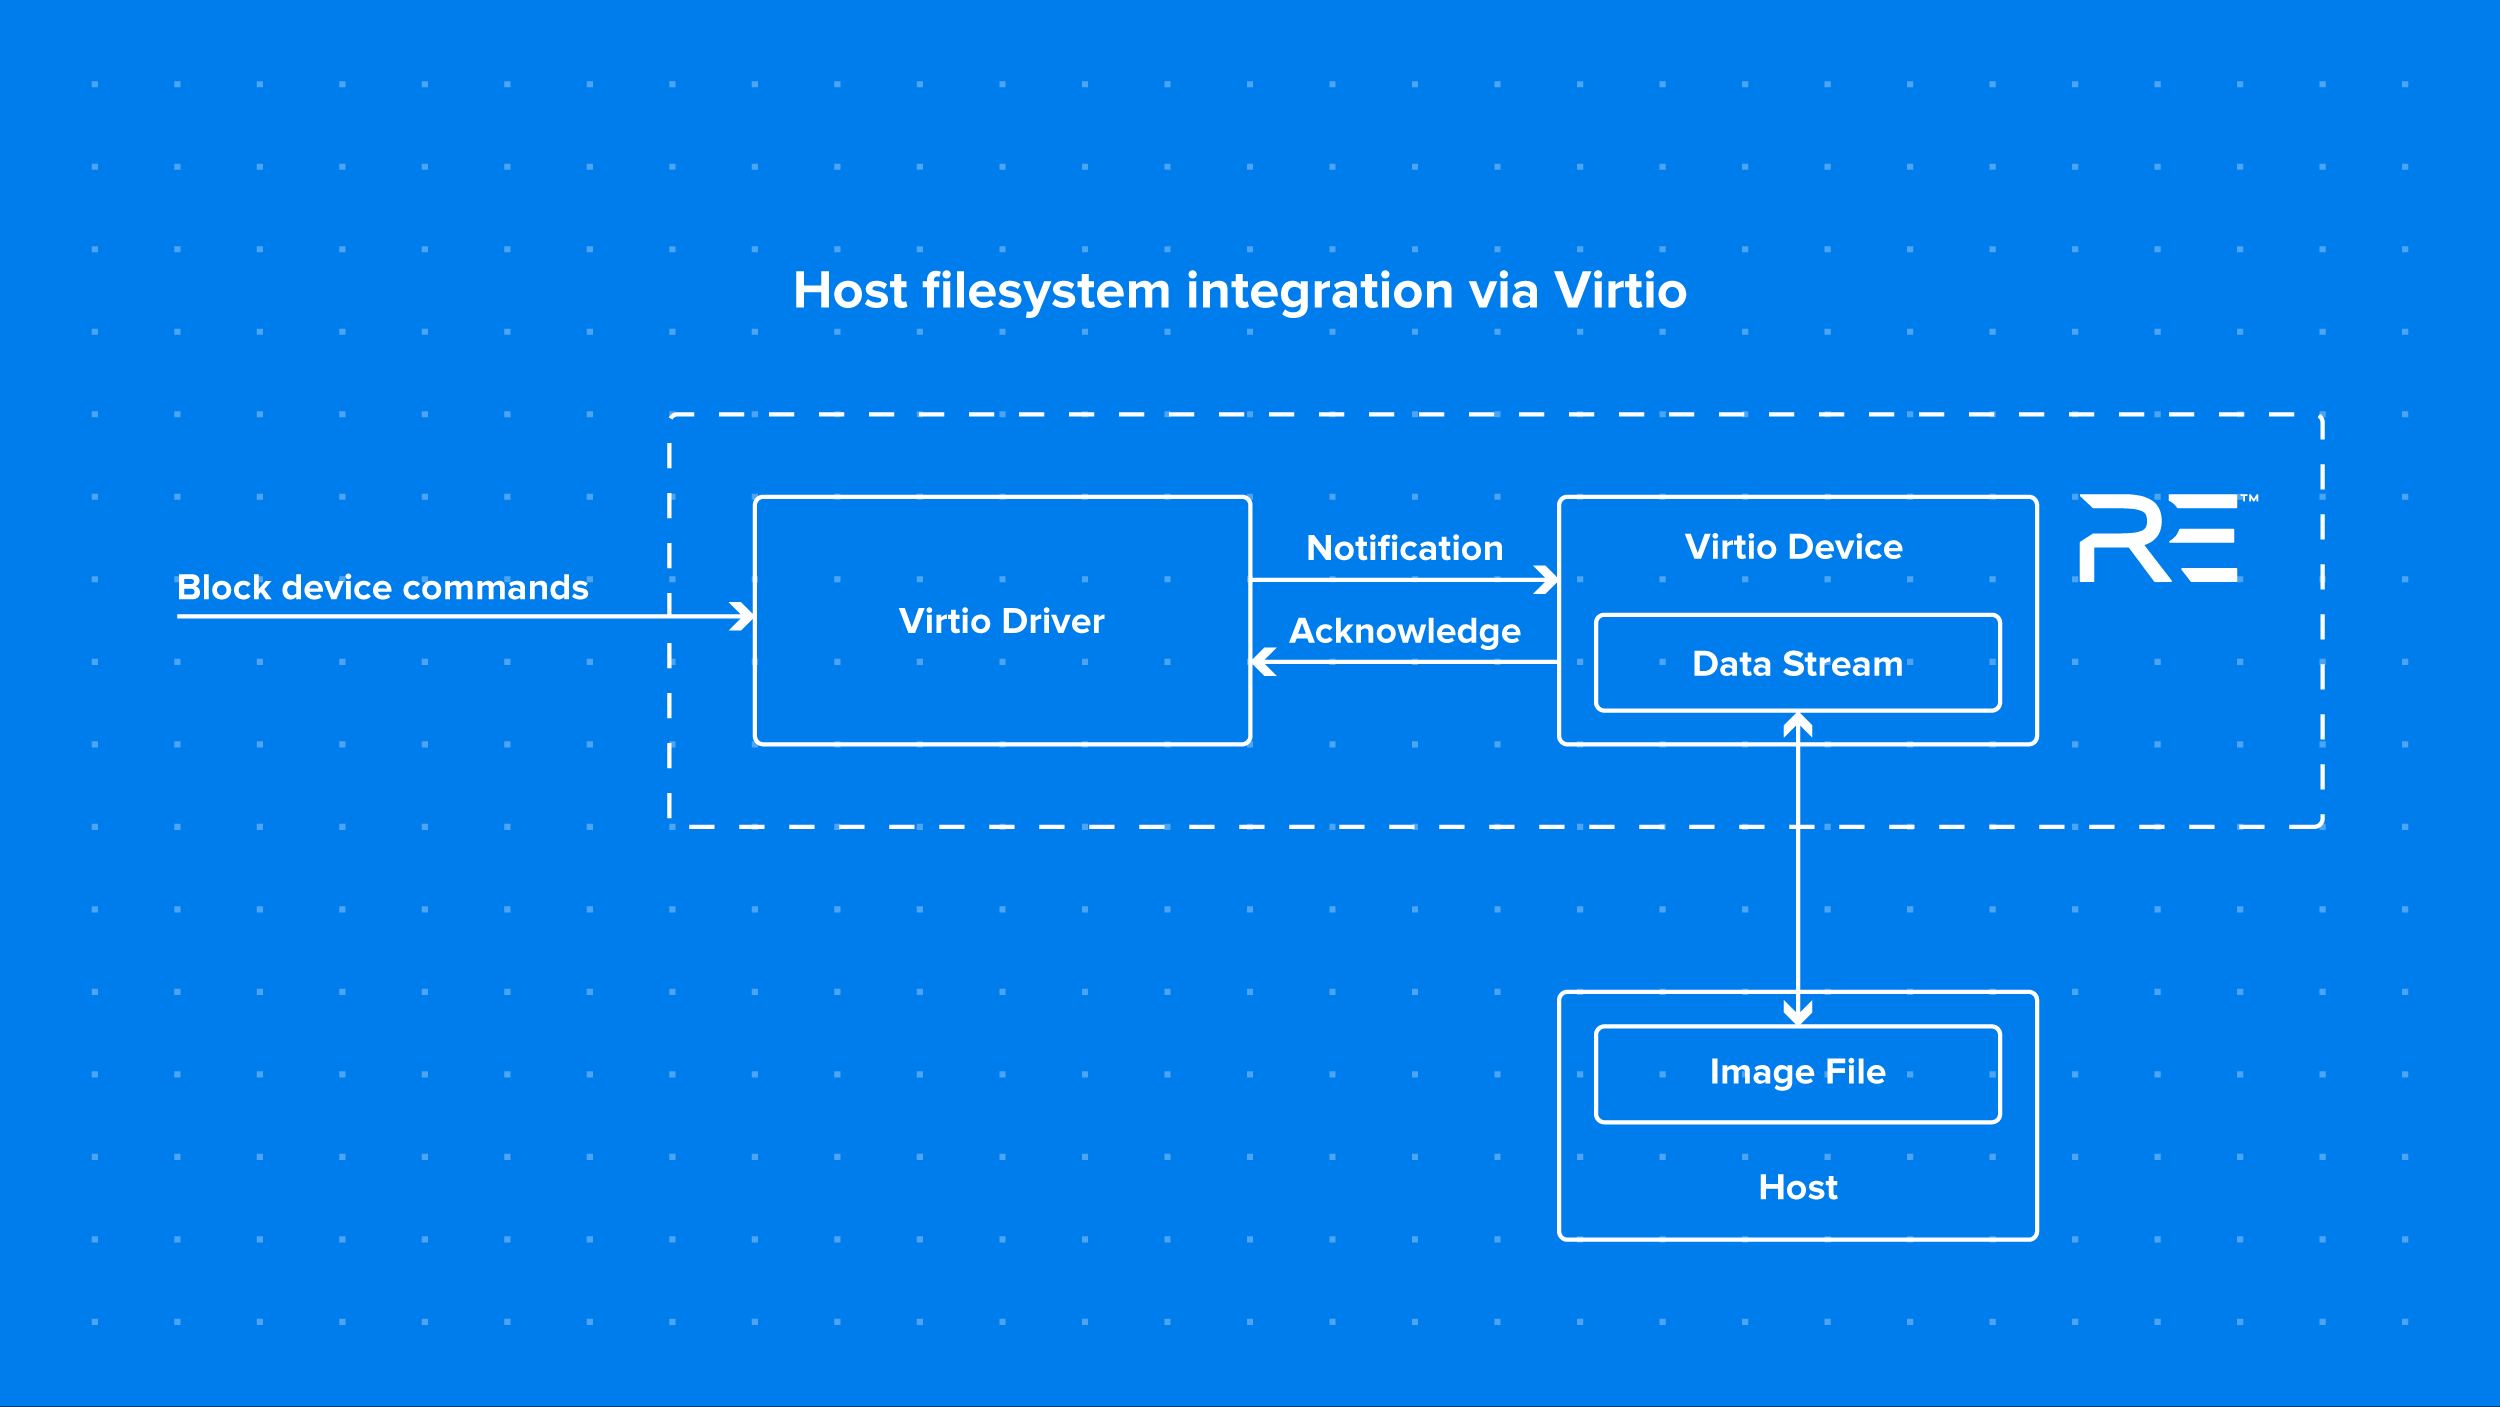
Creating a simulation utilizing the Virtio device requires just a few simple steps, described below. We’ll show them on the example of Linux, but they should be fairly similar for other OSes supporting this technology.
The first step is to prepare the filesystem image and fill it with application and all other necessary resources. Assuming you are working on a Linux host, you should prepare a directory with files you want to constitute your root filesystem (we will call it simply rootfs from now on). Then, creating the rootfs image can be accomplished with:
$ truncate drive.img -s 128MB
$ mkfs.ext4 -d rootfs drive.img
For modifying the rootfs you can mount it as a loop device:
$ mount -o loop drive.img /mntAnd the desired content can be copied with a standard cp command:
$ cp myapp /mnt
$ sync
$ umount /mnt
The next step is to add the Virtio device support to the simulated Linux and the virtual platform in Renode. Since Linux v2.6.25 Virtio drivers are supported and should be enabled by default (you can check the CONFIG_VIRTIO and CONFIG_VIRTIO_BLK configuration options). All that is required on the simulated Linux side is to add a proper device tree entry describing the Virtio device bus location and interrupt configuration. For reference see the following example:
virtio@100d0000 {
	compatible = “virtio,mmio”;
	reg = <0x100d0000 0x150>;
	interrupt-parent = <&plic>;
	interrupts = <42>;
};
Now you need to add a corresponding extension to the Renode platform definition (the repl file):
virtio: Storage.VirtIOBlockDevice @ sysbus 0x100d0000 {
	IRQ -> plic@42;
}
Note that the addresses and interrupt line number must be consistent across repl and DTS (although you can choose different values from those in the example).
Finally you are ready to set up an underlying image for the Virtio block device by using the following command:
virtio LoadImage @drive.imgAnd that’s it - now your image will be visible in the simulated Linux as any other block device.
Note: By default Renode loads the image in a non-persistent mode. This means that all changes to the filesystem on the Virtio device will be dropped when the simulation is finished. If you are willing to make the Virtio device persistent you have to simply add the true argument at the end of the command:
virtio LoadImage @drive.img trueWhen working with this device you can use standard tools like dd or just mount it in order to get access to it in the simulation like in the command below. (It is worth noting that by default the VirtIO device is listed in Linux as /dev/vda.)
$ mount /dev/vda /mntNow you can hot-swap the underlying image when the simulation is running (just don’t forget to remount the device in the simulated Linux!).
It’s worth noting that the Virtio approach has several advantages over the previously described network-based solutions.
First of all, there is no need for having a platform-specific network controller modelled in Renode. This means not only a simpler/faster simulation, but also opening the solution for platforms not supporting the network interface at all. Serving big chunks of data is also faster with Virtio compared to simulated network transfers.
With Virtio being a standard for a long time, there are plenty of open drivers available around. This means it is either available out-of-the-box in many OSes (including Linux) or should be relatively easy to add. We consider this to be the easiest way to feed a simulated Linux machine with custom data - be it an actively developed application, a database or any other kind of payload. It’s usable in CI environments and can be easily adapted to virtually any scenario.
Boost your embedded development with Renode
While working with precompiled root filesystems is not always easy, Renode provides ways to make developers’ lives easier. With features like host-guest networking, TFTP support and Virtio, we are now able to provide an easy to use, deterministic and testable framework for userspace application development. Whereas all of these features work in slightly different conditions, Renode aims to support various workflows and scenarios.
Antmicro provides services helping Renode users not only in emulating their target platforms, but also helping integrate our framework with their custom workflows, tools and CI systems. Reach out to us at contact@renode.io if you want to seamlessly improve your everyday development with proper testing of complex embedded systems. You can also follow us on Twitter to stay up to date with Renode news.


